For making a maze in Unreal Editor 4, the first thing I did was to go online and find an already existing layout for a map. I judged it was probably harder than it looked to create a good maze of this nature, and since all I was interested in was the 3D creation aspect rather than the design of the layout itself, I skipped this step and went straight to the 3D creation stage.

Turning the texture into a material, I created a large Geometry Shape and applied this material to it, scaling it to the size required for the player to be able to run around inside it.

An outer wall was then added around the template to ensure the player character, even during testing, could not fall off the edge of the map, except via the entry or exit doorways which were part of the map.

Using the template, upon which everything was being made, I created a number of further Geometry shapes and began positioning them in the world, in such a manner as to match the layout of the plan

This was continued. After placing all of the x-axis walls, the y-axis ones were placed: their heights and lengths adjusted to the requirements of the design beneath.

I then added cylindrical pillars in a number of key locations — things that could act, in part, as markers, both to help the player make educated guesses about where things were, and to make one location discernible from another (assisting in memorizing the layout of the map).

Here is the map as it thereto stands. The pillars have been arranged and all the walls are in place.

I then attached lights to the tops of each of the cylinders, giving them the added function of giving light to the location as well as making them more noticeable.

I added, also, a gate (see image below, near the top, on the right) with a partly transparent material, also using a trigger box just inside the door and a Level Sequence to animate the door dropping down if the player was to try and leave back the way they came.

To assist the player in being able to more accurately judge where they were in the map, I raised the size of the outer wall by a significant amount.

Then materials were applied to all objects in the game. A metal material was chosen, because the dark, metallic shine gives the world an atmosphere of being dangerous and edgy, with a greater feeling of being ‘trapped’ coming about rather than the idea of just going through a maze for fun. The reflectiveness also helped light the map with the limited number of light sources, and made it more visually interesting.

This material alone, of course, would not work, so I gave the floor a lighter material, and changed the large, outer walls to a bronze colour, again to help assist the player see where they were. Then I gave the cylinders a golden material, to help reinforce the idea that they were markers of hope to the lost player.

I created an area for the player to spawn in, and marked it with gold; marking the end with the same colour to reinforce the idea that it was a refuge point, safety and the goal for the player to aim towards.

A long, gold staircase was also added, leading from the end of the level to give a sense of the player character’s ‘assertion’ to better things, perhaps even the idea of going up to heaven. Either way, the impression of ‘improvement’ on the part of the character is present.

Here is the map, the level now completed and playable.

This is a version with the route, the player would need to take, mapped out, and two images of the map at other angles. As can be seen, there is an opening in the dead centre of the map, which can be used in some way or other as a marker of something being ‘unveiled’ to the player. This links with the next aim of giving the maze more depth than just getting to the end of the map, with such things as collectibles and a timer.


I wanted a collection of 100 ‘coins’ to be deposited around the map. To create this, I first created a new Blueprint class ‘Actor’ and went into the blueprint.

Under the Actor viewport, a cylinder was then added, rotated and scaled to look similar to a coin. A ‘collision box’ was then added to it, which could be referenced in its blueprint.

Upon the player’s collision with this box collision (Event Actor BeginOverlap) the blueprint casts this information to the Player Character; to the ‘Coins’ variable created in the Player blueprint and then ‘Sets’ the coins variable to ‘+1’ of whatever it was before. Id est, it increases the number of coins, the player has, by one; then “destroys actor” at the end, to ensure it cannot be picked up more than once.
Also, because I did not want the coins to be motionless, but to ‘spin’ instead, I added a function to the “Event Tick” (which means it will be triggered 60 times a second) that it will trigger an “AddLocalRotation,” and set the variable as the time in ‘Delta Seconds’, meaning the value of time passed would be the amount of rotation of the object.
However, this meant all the coins rotated perfectly in sync, which appeared unnatural. A more ‘organic’ and professional look was wanted, and so the rotational value given by the ‘Delta Seconds’ count was multiplied by a random value, meaning every coin would rotate at different speeds.

I then also added a countdown timer. After playing, I judged that an estimate of time to complete the level, while collecting all coins, was around three minutes (200 seconds); so, creating a new ‘Time’ variable in the player blueprint, I set the value to two hundred and, upon the ‘BeginPlay’ of the level, programmed it to ‘SET time’ to ‘-1’ whatever it was before, and then to repeat this every one second, so long as ‘Time’ was greater than zero, upon which the subtraction of the one stops.

This information was presented on the Widget Blueprint which would be the HUD for the game, with text in the top right for “Coins Collected <value> of 100” and “Par time <value> seconds”.

The two ‘<value>s’ of these pieces of text refer to one of these two widget blueprints below; both casting the information to the FirstPersonCharacter. In order to read the variable of ‘Time’ and ‘Coins’, and then printing that information.

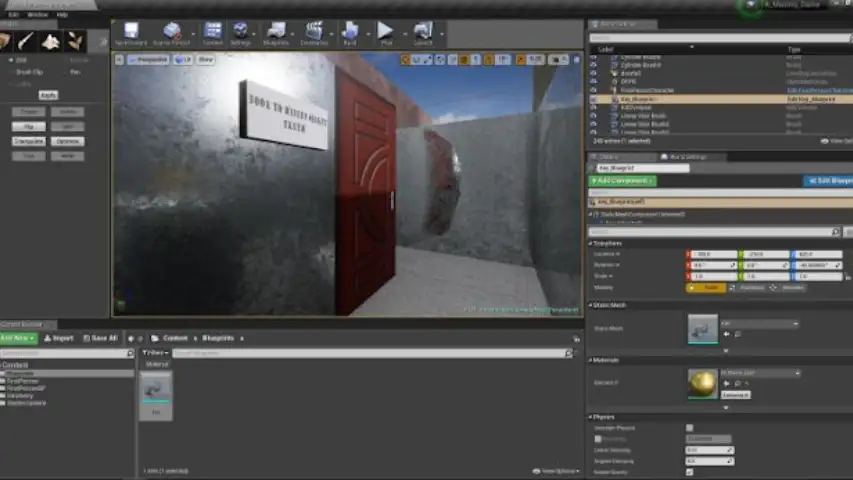
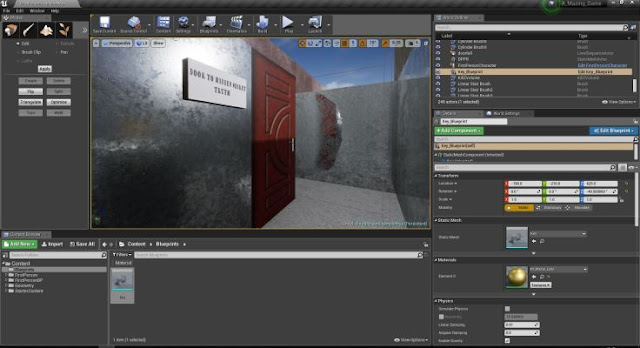
A door was also added — a door with a secret thing hidden inside it. The door requires two Boolean variables (which are ‘true’ or ‘false’) to be true: that the player was close enough to the door to use it, and that they had picked up the key.
The latter was easy — a collision box was added to the blueprint of the door which casts to the FirstPersonCharacter, telling the Boolean variable to be either ‘true’ or ‘false’ if the player was inside the ‘collision range’ of the door or not.

It was then added to the Character’s blueprint that, upon pressing the ‘E’ key (at any time and stood from anywhere), it would trigger the event which would first check ‘If’ the player was even in range of using the door, and then, if they did, it’d check to see if they had the key. If both were true, it then played a Level Sequence animation to open the door.

Here is the door with the secret hidden behind it.
The key was then added in the centre of the maze, in a similar way to the keys with a box collision, contact with which first destroys the actor to prevent it being picked up twice, and then it’d send an instruction (via ‘Cast to FirstPersonCharacter’) to ‘SET’ the ‘Has Key’ variable to ‘true’.

To make the key more noticeable, I then wanted it to ‘pulsate’, meaning it would grow and shrink rhythmically. This was a difficult thing to achieve, but the problem was resolved with the following method:
- A ‘Size’ float variable (floats being able to have numbers with decimals) and a ‘Growing’ Boolean variable, set ‘Size’ to 0.7 and ‘Growing’ to ‘true’.
- On the ‘Event BeginPlay’, the code was then programmed to check to see if ‘Growing’ was ‘true’; if it was, it ‘+1’ to the ‘size’ variable, and, if not, ‘-1’ to the ‘size’ variable. It then waited for a delay of 0.1 seconds, and then checked to see if it was’ Growing’ again, thus, returning to the loop.
- This now means that, depending on if the object was growing or not growing, the ‘size’ would go up or down at a steady rate. Now, all that needs to be programmed is a function that makes the object check if it should be growing or shrinking, depending on its size.
- On ‘Event Tick’, the object’s size was set with a “Set Actor Scale 3D” node with the ‘Size’ variable acting as its size. It then checked to see if the size was equal to 1.1 (which would be the maximum size). If it was (was on the maximum size) it set ‘Growing’ to ‘false’ as it was now as large as it should be.
- If it was ‘false’ that it was not at its max size (meaning it was smaller, but not necessarily, if it was growing or shrinking).
- Originally, there was a problem that the object would grow from its smallest size to its largest, but would then stay at the largest size, because, as soon as it became smaller, it was then less than the max size which set ‘Growing’ to true again. Hence, the ‘false’ was changed from directly setting ‘Growing’ to ‘true’, and replaced with a second ‘if statement’ to see if it was small enough to qualify, meaning ‘Growing’ was set to true or false when it was right for it to do so.

Here is the blueprint for the finished key. This key will pulsate rhythmically and can be ‘picked up’ by the player, allowing them to open the secret door near the end of the map.

This is the small clearing in the centre of the map now; a half-way reward of a large number of coins in one place, and the key, upon a pedestal, in gold and pulsating to show its importance.

The maze — the amazing maze — is now completed.